# Django - Form Processing
Creating forms in Django, is really similar to creating a model. Here again, we just need to inherit from Django class and the class attributes will be the form fields. Let's add a **forms.py** file in myapp folder to contain our app forms. We will create a login form.
**myapp/forms.py**
```
#-*- coding: utf-8 -*-
from django import forms
class LoginForm(forms.Form):
user = forms.CharField(max_length = 100)
password = forms.CharField(widget = forms.PasswordInput())
```
As seen above, the field type can take "widget" argument for html rendering; in our case, we want the password to be hidden, not displayed. Many others widget are present in Django: **DateInput** for dates, **CheckboxInput** for checkboxes, etc.
## Using Form in a View
There are two kinds of HTTP requests, GET and POST. In Django, the request object passed as parameter to your view has an attribute called "method" where the type of the request is set, and all data passed via POST can be accessed via the request.POST dictionary.
Let's create a login view in our myapp/views.py −
```
#-*- coding: utf-8 -*-
from myapp.forms import LoginForm
def login(request):
username = "not logged in"
if request.method == "POST":
#Get the posted form
MyLoginForm = LoginForm(request.POST)
if MyLoginForm.is_valid():
username = MyLoginForm.cleaned_data['username']
else:
MyLoginForm = Loginform()
return render(request, 'loggedin.html', {"username" : username})
```
The view will display the result of the login form posted through the **loggedin.html**. To test it, we will first need the login form template. Let's call it login.html.
```
```
The template will display a login form and post the result to our login view above. You have probably noticed the tag in the template, which is just to prevent Cross-site Request Forgery (CSRF) attack on your site.
```
{% csrf_token %}
```
Once we have the login template, we need the loggedin.html template that will be rendered after form treatment.
```
You are : {{username}}
```
Now, we just need our pair of URLs to get started: myapp/urls.py
```
from django.conf.urls import patterns, url
from django.views.generic import TemplateView
urlpatterns = patterns('myapp.views',
url(r'^connection/',TemplateView.as_view(template_name = 'login.html')),
url(r'^login/', 'login', name = 'login'))
```
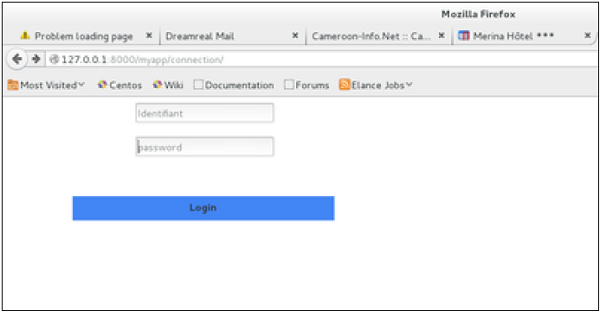
When accessing "/myapp/connection", we will get the following login.html template rendered −
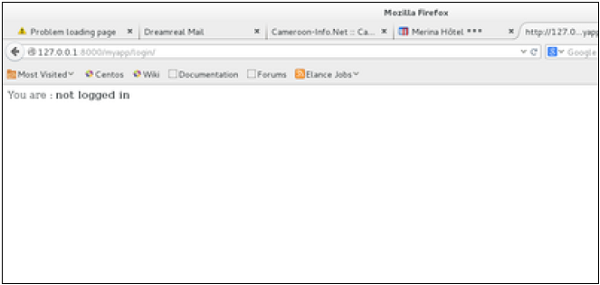
On the form post, the form is valid. In our case make sure to fill the two fields and you will get −

In case your username is polo, and you forgot the password. You will get the following message −
### Using Our Own Form Validation
In the above example, when validating the form −
```
MyLoginForm.is_valid()
```
We only used Django self-form validation engine, in our case just making sure the fields are required. Now let’s try to make sure the user trying to login is present in our DB as Dreamreal entry. For this, change the myapp/forms.py to −
```
#-*- coding: utf-8 -*-
from django import forms
from myapp.models import Dreamreal
class LoginForm(forms.Form):
user = forms.CharField(max_length = 100)
password = forms.CharField(widget = forms.PasswordInput())
def clean_message(self):
username = self.cleaned_data.get("username")
dbuser = Dreamreal.objects.filter(name = username)
if not dbuser:
raise forms.ValidationError("User does not exist in our db!")
return username
```
Now, after calling the "is\_valid" method, we will get the correct output, only if the user is in our database. If you want to check a field of your form, just add a method starting by "clean\_" then your field name to your form class. Raising a forms.ValidationError is important.