# Node.js - Express Framework
## Express Overview
Express is a minimal and flexible Node.js web application framework that provides a robust set of features to develop web and mobile applications. It facilitates the rapid development of Node based Web applications. Following are some of the core features of Express framework −
- Allows to set up middlewares to respond to HTTP Requests.
- Defines a routing table which is used to perform different actions based on HTTP Method and URL.
- Allows to dynamically render HTML Pages based on passing arguments to templates.
## Installing Express
Firstly, install the Express framework globally using NPM so that it can be used to create a web application using node terminal.
```
$ npm install express --save
```
The above command saves the installation locally in the **node\_modules** directory and creates a directory express inside node\_modules. You should install the following important modules along with express −
- **body-parser** − This is a node.js middleware for handling JSON, Raw, Text and URL encoded form data.
- **cookie-parser** − Parse Cookie header and populate req.cookies with an object keyed by the cookie names.
- **multer** − This is a node.js middleware for handling multipart/form-data.
```
$ npm install body-parser --save
$ npm install cookie-parser --save
$ npm install multer --save
```
## Hello world Example
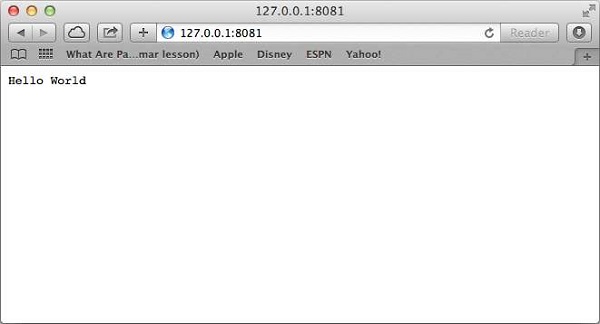
Following is a very basic Express app which starts a server and listens on port 8081 for connection. This app responds with **Hello World!** for requests to the homepage. For every other path, it will respond with a **404 Not Found.**
```
var express = require('express');
var app = express();
app.get('/', function (req, res) {
res.send('Hello World');
})
var server = app.listen(8081, function () {
var host = server.address().address
var port = server.address().port
console.log("Example app listening at http://%s:%s", host, port)
})
```
Save the above code in a file named server.js and run it with the following command.
```
$ node server.js
```
You will see the following output −
```
Example app listening at http://0.0.0.0:8081
```
Open http://127.0.0.1:8081/ in any browser to see the following result.
## Request & Response
Express application uses a callback function whose parameters are **request** and **response** objects.
```
app.get('/', function (req, res) {
// --
})
```
- [Request Object](https://www.tutorialspoint.com/nodejs/nodejs_request_object.htm) − The request object represents the HTTP request and has properties for the request query string, parameters, body, HTTP headers, and so on.
- [Response Object](https://www.tutorialspoint.com/nodejs/nodejs_response_object.htm) − The response object represents the HTTP response that an Express app sends when it gets an HTTP request.
You can print **req** and **res** objects which provide a lot of information related to HTTP request and response including cookies, sessions, URL, etc.
## Basic Routing
We have seen a basic application which serves HTTP request for the homepage. Routing refers to determining how an application responds to a client request to a particular endpoint, which is a URI (or path) and a specific HTTP request method (GET, POST, and so on).
We will extend our Hello World program to handle more types of HTTP requests.
```
var express = require('express');
var app = express();
// This responds with "Hello World" on the homepage
app.get('/', function (req, res) {
console.log("Got a GET request for the homepage");
res.send('Hello GET');
})
// This responds a POST request for the homepage
app.post('/', function (req, res) {
console.log("Got a POST request for the homepage");
res.send('Hello POST');
})
// This responds a DELETE request for the /del_user page.
app.delete('/del_user', function (req, res) {
console.log("Got a DELETE request for /del_user");
res.send('Hello DELETE');
})
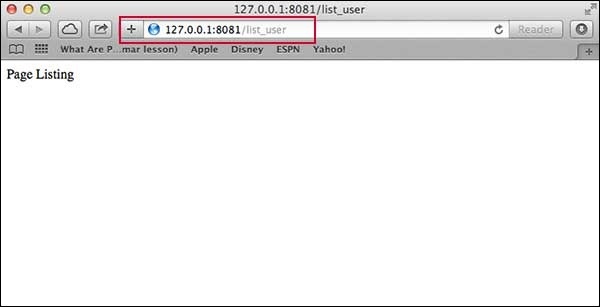
// This responds a GET request for the /list_user page.
app.get('/list_user', function (req, res) {
console.log("Got a GET request for /list_user");
res.send('Page Listing');
})
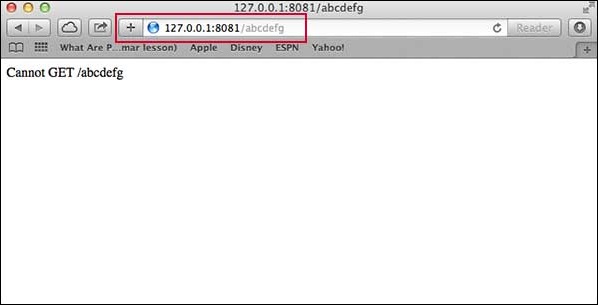
// This responds a GET request for abcd, abxcd, ab123cd, and so on
app.get('/ab*cd', function(req, res) {
console.log("Got a GET request for /ab*cd");
res.send('Page Pattern Match');
})
var server = app.listen(8081, function () {
var host = server.address().address
var port = server.address().port
console.log("Example app listening at http://%s:%s", host, port)
})
```
Save the above code in a file named server.js and run it with the following command.
```
$ node server.js
```
You will see the following output −
```
Example app listening at http://0.0.0.0:8081
```
Now you can try different requests at http://127.0.0.1:8081 to see the output generated by server.js. Following are a few screens shots showing different responses for different URLs.
Screen showing again http://127.0.0.1:8081/list\_user
Screen showing again http://127.0.0.1:8081/abcd
Screen showing again http://127.0.0.1:8081/abcdefg
## Serving Static Files
Express provides a built-in middleware **express.static** to serve static files, such as images, CSS, JavaScript, etc.
You simply need to pass the name of the directory where you keep your static assets, to the **express.static** middleware to start serving the files directly. For example, if you keep your images, CSS, and JavaScript files in a directory named public, you can do this −
```
app.use(express.static('public'));
```
We will keep a few images in **public/images** sub-directory as follows −
```
node_modules
server.js
public/
public/images
public/images/logo.png
```
Let's modify "Hello Word" app to add the functionality to handle static files.
```
var express = require('express');
var app = express();
app.use(express.static('public'));
app.get('/', function (req, res) {
res.send('Hello World');
})
var server = app.listen(8081, function () {
var host = server.address().address
var port = server.address().port
console.log("Example app listening at http://%s:%s", host, port)
})
```
Save the above code in a file named server.js and run it with the following command.
```
$ node server.js
```
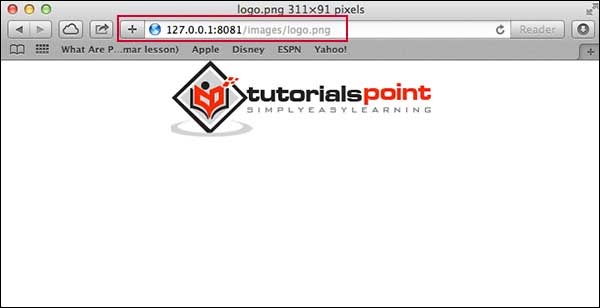
Now open http://127.0.0.1:8081/images/logo.png in any browser and see observe following result.
## GET Method
Here is a simple example which passes two values using HTML FORM GET method. We are going to use **process\_get** router inside server.js to handle this input.
```
```
Let's save above code in index.htm and modify server.js to handle home page requests as well as the input sent by the HTML form.
```
var express = require('express');
var app = express();
app.use(express.static('public'));
app.get('/index.htm', function (req, res) {
res.sendFile( __dirname + "/" + "index.htm" );
})
app.get('/process_get', function (req, res) {
// Prepare output in JSON format
response = {
first_name:req.query.first_name,
last_name:req.query.last_name
};
console.log(response);
res.end(JSON.stringify(response));
})
var server = app.listen(8081, function () {
var host = server.address().address
var port = server.address().port
console.log("Example app listening at http://%s:%s", host, port)
})
```
Accessing the HTML document using *http://127.0.0.1:8081/index.htm* will generate the following form −
```
```
Now you can enter the First and Last Name and then click submit button to see the result and it should return the following result −
```
{"first_name":"John","last_name":"Paul"}
```
## POST Method
Here is a simple example which passes two values using HTML FORM POST method. We are going to use **process\_get** router inside server.js to handle this input.
```
```
Let's save the above code in index.htm and modify server.js to handle home page requests as well as the input sent by the HTML form.
```
var express = require('express');
var app = express();
var bodyParser = require('body-parser');
// Create application/x-www-form-urlencoded parser
var urlencodedParser = bodyParser.urlencoded({ extended: false })
app.use(express.static('public'));
app.get('/index.htm', function (req, res) {
res.sendFile( __dirname + "/" + "index.htm" );
})
app.post('/process_post', urlencodedParser, function (req, res) {
// Prepare output in JSON format
response = {
first_name:req.body.first_name,
last_name:req.body.last_name
};
console.log(response);
res.end(JSON.stringify(response));
})
var server = app.listen(8081, function () {
var host = server.address().address
var port = server.address().port
console.log("Example app listening at http://%s:%s", host, port)
})
```
Accessing the HTML document using *http://127.0.0.1:8081/index.htm* will generate the following form −
```
```
Now you can enter the First and Last Name and then click the submit button to see the following result −
```
{"first_name":"John","last_name":"Paul"}
```
## File Upload
The following HTML code creates a file uploader form. This form has method attribute set to **POST** and enctype attribute is set to **multipart/form-data**
```
File Uploading Form
File Upload:
Select a file to upload:
```
Let's save above code in index.htm and modify server.js to handle home page requests as well as file upload.
```
var express = require('express');
var app = express();
var fs = require("fs");
var bodyParser = require('body-parser');
var multer = require('multer');
app.use(express.static('public'));
app.use(bodyParser.urlencoded({ extended: false }));
app.use(multer({ dest: '/tmp/'}));
app.get('/index.htm', function (req, res) {
res.sendFile( __dirname + "/" + "index.htm" );
})
app.post('/file_upload', function (req, res) {
console.log(req.files.file.name);
console.log(req.files.file.path);
console.log(req.files.file.type);
var file = __dirname + "/" + req.files.file.name;
fs.readFile( req.files.file.path, function (err, data) {
fs.writeFile(file, data, function (err) {
if( err ) {
console.log( err );
} else {
response = {
message:'File uploaded successfully',
filename:req.files.file.name
};
}
console.log( response );
res.end( JSON.stringify( response ) );
});
});
})
var server = app.listen(8081, function () {
var host = server.address().address
var port = server.address().port
console.log("Example app listening at http://%s:%s", host, port)
})
```
Accessing the HTML document using *http://127.0.0.1:8081/index.htm* will generate the following form −
```
File Upload:
Select a file to upload:
NOTE: This is just dummy form and would not work, but it must work at your server.
```
## Cookies Management
You can send cookies to a Node.js server which can handle the same using the following middleware option. Following is a simple example to print all the cookies sent by the client.
```
var express = require('express')
var cookieParser = require('cookie-parser')
var app = express()
app.use(cookieParser())
app.get('/', function(req, res) {
console.log("Cookies: ", req.cookies)
})
app.listen(8081)
```